This checklist is for riders setting up a garage for routine motorcycle maintenance, from steadying a bike to caring for its chain and battery. Start with the jobs you do most often, and choose equipment that fits your motorcycle and the way you work. A stable setup makes maintenance easier to plan and carry out.

Get business pricing on garage and car supplies
- Business-only prices and quantity discounts
- Tax-exempt purchasing
- Multiple users, one account, clear invoices
The sections follow practical garage tasks: lifting and securing the motorcycle, supporting its wheels, handling tire work, cleaning the chain, and maintaining the battery. Each slot focuses on one type of equipment, with a pick and a short list of details to check before buying. Match the tool to the task you expect it to handle.
Use the look-for list to compare options, then check your motorcycle’s specifications and the product’s fit requirements before ordering. Pay particular attention to wheel sizes, support points, and electrical compatibility where relevant. Add equipment in the order that suits your maintenance routine, and keep compatibility first as you build the checklist.
Motorcycle lift
A lift can make garage work more accessible by raising the motorcycle to a working height. This slot matters when routine maintenance involves reaching areas that are awkward to access with the bike on its tires. Before choosing a lift, confirm the motorcycle’s weight and how its frame or other support points interact with the lift table. A model’s stated capacity is only one part of suitability; the motorcycle must also be positioned and secured as the manufacturer intends. Stable support is the first consideration.
Common mistakes include assuming every motorcycle can be lifted the same way, overlooking table dimensions, or buying before checking how the bike is secured. Consider the space available around the lift, including room to roll the motorcycle into position and move around it while working. Check whether the lift’s approach and working height suit your garage layout and the tasks you plan to perform. Read the product instructions and your motorcycle’s service guidance for approved lifting points. The Black Widow Professional Motorcycle Shop Kit, 1,500 lb. Lift Table is the pick for this slot; verify capacity and fit against your bike before use.
What to look for:
- Confirm the motorcycle’s weight is within the lift’s stated capacity.
- Check table dimensions against the motorcycle’s footprint.
- Verify the bike’s approved lifting and support points.
- Measure garage clearance for positioning and working around the lift.
- Review the instructions for securing the motorcycle.
Black Widow Professional Motorcycle Shop Kit, 1,500 lb. Lift Table
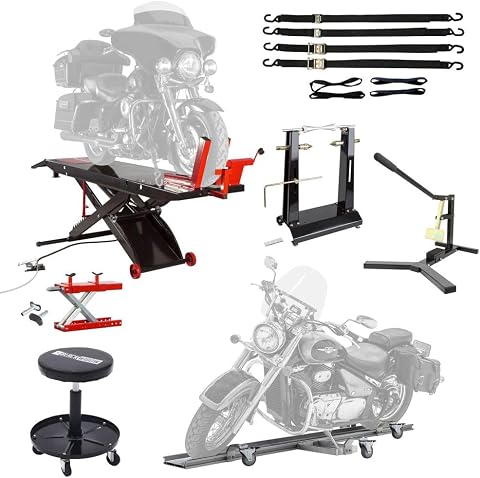
This professional motorcycle maintenance kit includes a pneumatic lift table with a 1,500 lb capacity, a motorcycle dolly, rolling stool, tire bead breaker, wheel balancer and truing stand, and various tie-downs and soft loops. Designed for routine service, the durable powder-coated steel lift table offers adjustable height for convenience and safety.
Pros:
- Comprehensive set for motorcycle maintenance
- Heavy-duty 1,500 lb lift capacity
- Durable powder-coated steel construction
- Includes safety tie-downs and tools
Cons:
- Large kit may require significant storage space
- Assembly and setup may be time-consuming
- Some components may be heavy to move
Best for: Riders who want a dedicated lift table for motorcycle maintenance.
Not ideal for: Garages where the motorcycle or lift cannot be positioned with adequate clearance.
Bottom line: Choose the Black Widow Professional Motorcycle Shop Kit, 1,500 lb. Lift Table after confirming capacity, dimensions, and approved support points for your motorcycle.
Motorcycle wheel chock
A wheel chock helps hold a motorcycle’s front wheel in position while the bike is parked or being secured for a task. It earns a place on this checklist because keeping the wheel steady can make other garage routines more manageable. Fit depends on the tire and wheel, so check the chock’s compatibility details against your motorcycle rather than assuming a general-purpose design will work. Also consider where you plan to use it and how the chock is intended to be secured. Wheel fit matters from the start.
A common buying mistake is focusing on the motorcycle category while skipping the actual tire dimensions and the chock’s setup requirements. Check the product instructions for the wheel range, positioning, and any mounting or anchoring needs. Think through whether you’ll use the chock in a fixed garage location or as part of another setup, and make sure the available floor or platform suits that use. The CONDOR Pit-Stop/Trailer-Stop PS-1500 Motorcycle Wheel Chock is the selected pick. Before buying, confirm tire compatibility and installation details for your intended location.
What to look for:
- Compare the front tire and wheel dimensions with the stated fit range.
- Check how the chock is mounted or secured for your intended use.
- Confirm the floor or platform is suitable for the chock’s setup.
- Review instructions for placing and removing the motorcycle.
- Consider whether you need a fixed garage or transport-related setup.
CONDOR Pit-Stop/Trailer-Stop PS-1500 Motorcycle Wheel Chock

The CONDOR Pit-Stop securely holds a motorcycle upright on a flat surface or transport platform without a kickstand. It can also be used as a Trailer-Stop with the optional Trailer Adapter Kit, and helps with storage, servicing, and cleaning.
Pros:
- Holds a motorcycle upright without a kickstand
- Works on flat surfaces and transport platforms
- Can be adapted for use as a Trailer-Stop
Cons:
- Trailer use requires an optional adapter kit
Best for: Riders who need a dedicated front-wheel holding option.
Not ideal for: Motorcycles whose wheel dimensions or intended setup fall outside the chock’s fit requirements.
Bottom line: Check the CONDOR Pit-Stop/Trailer-Stop PS-1500 against your tire dimensions and planned installation before purchasing.
Motorcycle paddock stand
A paddock stand supports a motorcycle for tasks where the bike needs to be held upright and a wheel may need to be accessible. This slot is useful for riders whose maintenance routine calls for a separate stand rather than a lift table. Fit depends on the motorcycle’s geometry and the stand’s contact points, so check how the front and rear setups work with your particular bike. Confirm the motorcycle has the appropriate points or configuration required by the stand. Support-point fit should guide the choice.
One common mistake is treating “universal” in a product name as proof that the stand fits every motorcycle without adjustment or additional considerations. Check the stand’s instructions for compatible configurations, required adapters, and the process for safely raising and lowering the bike. Consider how much clear floor space you have and whether you can position the motorcycle and stand as directed. The Universal Front and Rear GP Pro Series Motorcycle Paddock Stands Black is the pick for this slot. Review the product details and motorcycle guidance together to confirm front and rear compatibility.
What to look for:
- Confirm the stand supports your motorcycle’s front and rear configuration.
- Check contact-point or adapter requirements for your bike.
- Review the lifting and lowering instructions before use.
- Measure the available floor space around the motorcycle.
- Verify the bike’s support points against its service guidance.
Universal Front and Rear GP Pro Series Motorcycle Paddock Stands Black

This heavy-duty GP Pro Series motorcycle stand set includes front and rear stands with solid steel frames, compatible with most sportbikes, sport touring, and hyper naked bikes. The rear stand features universal swingarm and spool adapters, while the front stand has rubberized fork rollers to protect the forks.
Pros:
- Heavy-duty construction for durability
- Universal compatibility with many bikes
- Includes multiple adapters and protective rollers
- Backed by a lifetime warranty
Cons:
- May be heavy to move around
- Design may not fit all motorcycle models
Best for: Riders looking for front and rear paddock stand options.
Not ideal for: Motorcycles that lack compatible support points or require an unlisted setup.
Bottom line: Confirm fit and any adapter needs for the Universal Front and Rear GP Pro Series Motorcycle Paddock Stands Black before use.
Motorcycle tire changer
A tire changer is for riders who want to handle motorcycle tire work in their garage. The key fit question is whether the changer supports the wheel sizes you need, along with any other requirements listed by its manufacturer. Tire work also calls for a suitable workspace and careful attention to instructions, so consider how the tool will be positioned and used before adding it to your setup. Wheel-size range is a practical starting point.
A common mistake is to rely on a broad wheel-size description without checking the exact wheel dimensions and setup details for your motorcycle. The Rabaconda Motorcycle Tire Changer Starter Kit for 12–21-Inch Wheels names a wheel range, but confirm that your wheels fall within the stated range and that the product instructions cover your intended job. Check what is included in the kit, what else may be needed, and how much space you’ll need to operate it. Make sure your work area allows you to follow the instructions without obstruction. Use the manufacturer’s guidance to confirm fit and safe setup before tackling tire work.
What to look for:
- Check that your wheel sizes fall within the stated 12–21-inch range.
- Review the product details for the kit’s included components.
- Confirm any additional tools or setup requirements in the instructions.
- Measure the space needed to position and operate the changer.
- Follow the motorcycle and tool guidance for tire work.
Rabaconda Motorcycle Tire Changer Starter Kit for 12–21-Inch Wheels

A portable manual tire changer for motorcycle wheels that lets you break beads and change tires at home or at the track. Its folding frame sets up without tools, and the plastic mounting head and covered tire iron help protect rims from scratches.
Pros:
- Works with a broad range of motorcycle wheel types and sizes
- Folding frame is portable and sets up without tools
- Protective mounting head and tire iron cover help prevent rim scratches
- Long lever is designed to break stubborn beads
Cons:
- Separate adapters are required for some wider hubs and cross-spoked wheels
Best for: Riders whose wheels fit the stated range and who plan garage tire work.
Not ideal for: Wheel sizes or work setups that do not meet the product requirements.
Bottom line: Check wheel fit and kit contents for the Rabaconda Motorcycle Tire Changer Starter Kit before planning tire work.
Motorcycle chain cleaner
Chain care is a recurring garage task, so a dedicated cleaning and lubrication kit can keep the basic supplies together. This slot matters to riders whose motorcycles have a chain and whose maintenance guidance calls for regular chain cleaning and lubrication. Check that the kit’s intended use matches your chain and follow the motorcycle manufacturer’s recommendations for cleaning products and service intervals. Chain compatibility and the correct care method matter more than convenience alone.
A common buying mistake is assuming all chains call for the same products or that a kit replaces the motorcycle’s maintenance instructions. Review what the Moto Chain-Mate Motorcycle Chain Cleaning and Lubrication Kit includes, then compare those items with the care guidance for your motorcycle. Consider where you’ll clean the chain, how you’ll protect nearby surfaces, and how you’ll handle and store the supplies according to their labels. If your motorcycle uses a different drive arrangement, this slot may not apply. The pick is intended for chain cleaning and lubrication; make your bike’s guidance the reference for product use and routine.
What to look for:
- Confirm your motorcycle uses a chain and needs this type of care.
- Check the kit contents against your motorcycle’s chain-care guidance.
- Review product labels for use and handling instructions.
- Plan a workspace that allows chain cleaning without obstructed access.
- Follow the motorcycle maker’s recommended maintenance routine.
Moto Chain-Mate Motorcycle Chain Cleaning and Lubrication Kit

A motorcycle chain maintenance kit with adjustable telescopic rods designed to align with different chain geometries. It includes an overspray bath and reservoir to catch runoff, a brush for cleaning chains, sprockets, and swingarms, and a cap to help shield the rear tire and bike from solvents and lubricant.
Pros:
- Adjustable rods accommodate different chain geometries
- Reservoir catches overspray during maintenance
- Brush cleans chains, sprockets, and swingarms
- Cap helps protect the rear tire and bike from solvents and lubricant
Cons:
- Availability can vary
Best for: Riders whose motorcycles use a chain and need cleaning and lubrication supplies.
Not ideal for: Motorcycles without a chain or with different care requirements.
Bottom line: Compare the Moto Chain-Mate kit contents with your motorcycle’s chain-care instructions before use.
Motorcycle battery tender
A battery charger and maintainer can support a garage routine for caring for a motorcycle battery. This slot matters when you need charging or maintenance support during periods when the motorcycle is not being used. The listed product name specifies 12V/6V, but verify the battery type and electrical requirements for your motorcycle before connecting any charger. Voltage compatibility is an essential check.
A common mistake is choosing by voltage alone without checking the battery maker’s charging guidance, the charger’s instructions, and the correct connection process. Review the Battery Tender 4 Amp Smart Battery Charger and Maintainer (12V/6V Swit product details carefully, including the complete model name and its supported battery types. The supplied name is truncated, so use the full listing and manual to confirm the exact product configuration before purchase. Check where the charger will sit, how the cable reaches the motorcycle, and how you’ll keep the setup consistent with both manuals. Follow battery-specific instructions for connection, charging, and maintenance.
What to look for:
- Confirm the motorcycle battery voltage and type.
- Check the complete product listing and manual for supported batteries.
- Review the charger’s connection and use instructions.
- Plan a location and cable route that suit your garage setup.
- Follow the battery maker’s charging guidance.
Battery Tender 4 Amp Smart Battery Charger and Maintainer (12V/6V Switchable)

This fully automatic 4-amp smart charger and maintainer is designed for 12V and 6V batteries, including lead-acid, AGM, gel, and lithium (LiFePO4) types. It features ISM adaptive charging technology that automatically switches to float mode to maintain proper voltage without overcharging, making it ideal for cars, SUVs, trucks, motorcycles, and marine vehicles.
Pros:
- Automatically switches to float mode to prevent overcharging
- Compatible with a wide range of battery chemistries including Lithium and AGM
- Includes both alligator clips and ring terminals for versatile connection options
- Compact and lightweight design with long cord reach for easy storage
Cons:
- No explicit price information provided in the source text
- No customer rating information provided in the source text
Best for: Riders whose battery matches the charger’s stated specifications.
Not ideal for: Batteries with incompatible voltage, chemistry, or charging requirements.
Bottom line: Verify the complete Battery Tender model and battery compatibility before connecting the charger.
Build the checklist in the order that supports your actual maintenance routine: first the equipment needed to position and steady the motorcycle, then wheel and tire tools if those jobs are part of your plan, followed by chain and battery care items that match your bike. Confirm fit and compatibility at each step before adding a product.
You don’t need to assemble every slot at once. Start with the task you perform most often, check the motorcycle and product instructions, and add equipment as your garage needs become clearer. With a careful, bike-specific setup, this checklist can help you organize maintenance with confidence.